First game with the IS-2s, Encounter - Half my forces off the board, that meant I had one IS-2 and one platoon on the board = Loss. Can't physically contest 2 objectives, utter loss.
Think they'll be going on ebay due in part simply to my poor list making skills, that said there's very little extra these guys can run.
Saturday 27 August 2011
Friday 26 August 2011
They're Coming!
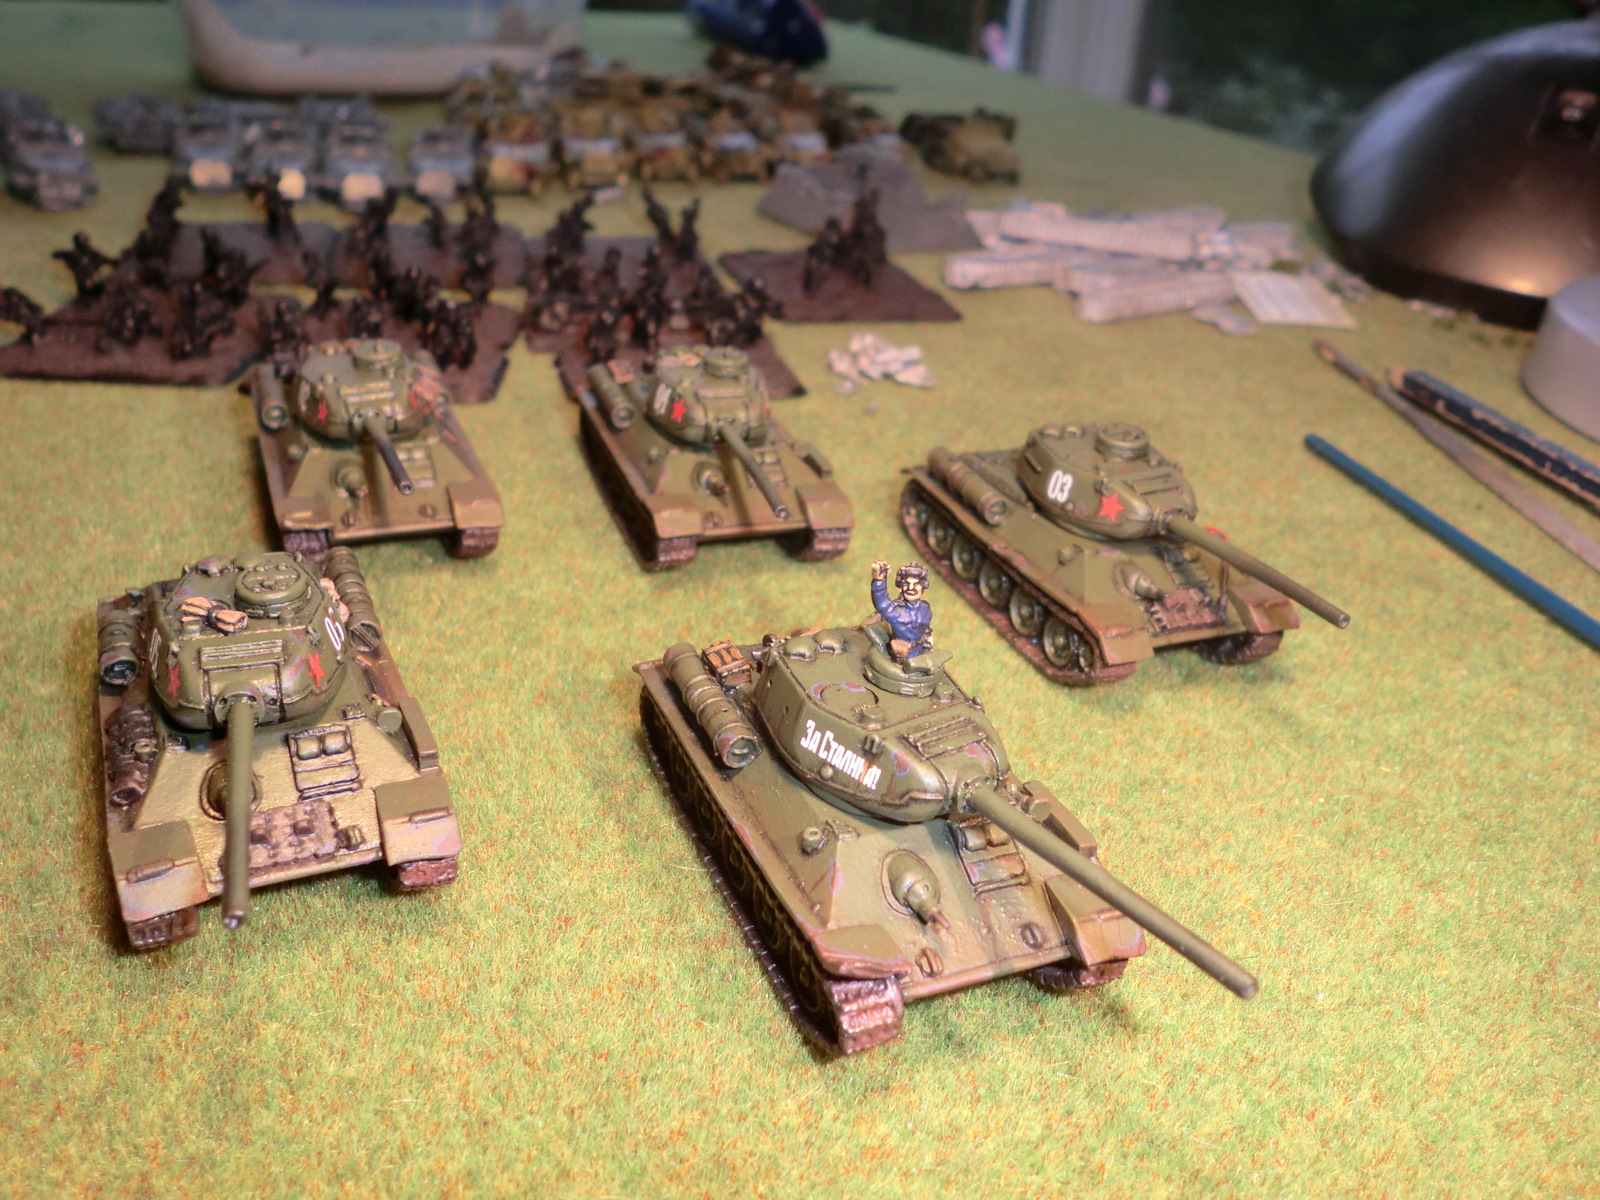
So I've been busy today, I stripped and worked on the older sculpted IS-2s I got from my mate Stoo and assembled the 3 new ones that arrived today.
I was in such a rush to get these painted I brushed primed them when my black aerosol ran out then I even brushed the Russian Green on when I broke my airbrush (more on that at another time, I've already ranted once today).

The discrepancies between the newer and older IS-2s is minimal, the newer models have resin sculpted cupolas whereas the new models come with 3 different white metal cupolas, open, closed and one modelled open with the commander manning the Dushka AA MG. I've used the manned AA MGs on all the new sculpts I've got, my reasoning for this is threefold:
1) They look cool as hell
2)All my IS-2s have them fitted in my list
3)Glueing the loose DShK to the loose cupolas will only end in tears. Sdkfz 250/251 AA MGs, I'm looking at you!
I'm thinking of doing these along the same lines as my T-34/85s but perhaps without the oil wash and just a standard GW wash. This for no other reason than I'm almost out of gloss varnish and I'll probably only get one coat for each tank out of what I have left. One things for sure is that I'll be using the same wear pattern (rust over pale blue) on these as on the T-34/85s (link).
[rant]
So I've been playing Flames of War for a good few years now and I always thought it was reasonably priced, I've spent into the thousands now in total. It was never cheap, and from a very old school GW player I remember when GW hit its pricing peak 10-15 years back and things were ludicrously priced. Thankfully my GW playing days had finished long before that so I was never subjected those costs.
Recently I've been looking at new options and lists for various periods and nations in Flames of War, I got myself some IS-2s to make a pure heavy guards armoured list and get into soviets without too many withdrawal symptoms from my Tigers and Panthers. A friend of mine had some old BF casts of these which we made a deal over, a day later he has two blisters of Russian 122 howitzers to inject some new life into his Strelkovy and I have 4 IS-2s to match the 3 new ones I've ordered.


The point in my post is this, I looked at the content of the 2 blisters I'd ordered for the upcoming trade and there really isn't a lot to them, I then looked at the price, then back at the blister. I'm just aghast at the cost of some of the blisters and packs you get from Battlefront and what you actually get in them. For £26 I've managed to get 4 guns, which is only 170 points of additional options for a Soviet Artillery Battalion, you need another 8 guns (£52) of blisters. That's a phenomenal £78 (At Battlefronts RRP) for 400 points of Soviet Arty Company before your artillery HQ blister.
The same can be said for other units, I priced an 8 vehicle Guards Rocket Mortar Battalion at £76 (again BFs RRP) for a 210 point option!? Starmonkee on here has noticed the same issue with a relatively low points costing battery of Panzerwerfer 42s at nigh on £80 with the arty HQ added in! Frankly, this is just ridiculous. yes, I know the point isn't about the cost per point on the table but the cost for the models, construction and packaging. That said I'm frequently seeing more and more poor value and a lot of poorly cast items from Battlefront, I love the quality of Battlefronts products in general but they are very, very small and no I'm not referring to the scale in general but to how much you get in a blister. When you unpack, de-flash, file, trim and base a Blister that just cost you £13 you appreciate just how much a few tiny little men and 2 small guns just cost you. I know that Battlefront is a company, not a charitably organisation but genuinely if this gets any worse I'll be dropping my whole collection on ebay for somebody who has the time, patience and disposable income to keep pursuing this hobby.
[/rant]
Thursday 25 August 2011
LW Panzergrenadiers almost finished!
So I've literally started from scratch with these in two days, quite happy with them, camo is so-so, not as good as my FJ but I spent NOWHERE near the amount of time on it.
I've tried some easy over highlighting on parts of the fieldgrey uniforms and some of the webbing in and effort to make them stand out a little. Better than most of the other infantry I've ever done so for a day or so's work I'm happy with them.


Tuesday 23 August 2011
T-34/95s finished
Finished the T-34/85s Stowage etc this afternoon... Then Rommel fell asleep on the stuff I was going to do next!


Monday 22 August 2011
T-34/85 Updates.
Got a few pics of my 99% finished T-34/85s, tiny bit of detailing to finish but they're almost there:


Thursday 18 August 2011
Quick Update
After a wedding at the weekend our camera (new one at that) has ceased to take a charge so I haven't been able to take pictures of the T-34/85s I've all but finished or the Challengers and work I've done on my Cromwells.
We've ordered new batteries so I should be back up and running at the weekend.
We've ordered new batteries so I should be back up and running at the weekend.
Wednesday 10 August 2011
LW Brit Infantry


Very quick pic of my almost completed LW Brit rifle/Motor platoon. I jumped the gun and did the basing first as I was so sick of painting, just the flesh tones to do and they're done. Quick and easy was the name of the game here and I haven't messed around with anything special at all, base, wash, drybrush, pick out details and done!
Tuesday 9 August 2011
Battle Report Tuesday 09/08/2011 Morpeth Gaming Club
Hi again everyone.
Its that time again for another battle report however this is going to be a quick fire one without many pictures.
Today myself and Nathan were invited to the Morpeth Gaming Club by Daniel, Nathans future brother in law.
The forces we choose for this game was Panzer Lehr Panzer Kompanie for myself and British 7th Armoured for Nathan
We began the setup of the board and rolled for the mission which was a straight up encounter nothing special. We then rolled for attacker/defender I lost like always and got stuck as defender.
We had to put at least half our platoons into reserves for the delayed reserve rule and scattered reserves which left me feeling quite naked with only four platoons in my force but none the less I put in what I considered the best units for holding down the coming tide.

Turn 1
As Nathan was the attack he had the first turn to which he quickly moved his platoons up to engage my panthers. His platoon on the right flank positioned itself behind a hedgerow to provide itself cover and the platoon on the right moved down my left flank towards my panzer grenadiers. When the shooting started Nathan' tanks on the right flank opened on up my panther platoon scoring successful hits which were however saved by myself. His tank platoon on my left flank however weren't so unlucky. His Firefly fired on my command HQ panther scoring a successful hit but only managed to bail him.
On my turn I made a school boy error and forgot two things. To roll for my bailed out tank and to roll to dig in my grenadiers. However on this minor note I forwent my movement and headed straight into shooting. I fired my panther platoon on the right flank into Nathan' armour requiring fives to hit and scored a successful hit. Nathan failed his armour check and I passed my firepower check resulting in one of his Cromwell's being engulfed in flames. I decided against doing s storm trooper move at this time as I felt unsure with the current forces on the board for myself.
Turn 2
Seeing the command HQ panther bailed still Nathan pushed his left platoon of Cromwell's up on my panzer grenadiers. He then dug his Tyne Tees rifle platoon in on his objective.
Onto the shooting, Nathan tried again to deal with the Panthers using his Firefly which hit again but only managed to bail the Panther it targeted. His Cromwell's now in MG range of my panzer grenadiers opened up in a hail of lead. They managed five hits however I made four infantry saves but the team was pinned at this point. Nathan then ended his turn.
At the start of my turn I rolled for my bailed out command panther and successfully got him back in his tank, I then rolled for my second panther and also got him back in. I left my command panther alone to take advantage of full RoF onto Nathan' exposed Cromwell's on the left flank.
I began the shooting with the with my panther platoon firing on the right flank scoring a successful hit and kill against Nathan' forces. My command panther and 2iC now shifted thier focus across to the other side of the field. The 2iC took a shot at the Firefly hiding behind the trees which my command HQ couldn't see. He successfully hit and took out this tank leaving only three Cromwell's on the left flank with a full RoF from the Command panther on the remaining Cromwell's.
Turn 3
At the start of turn three Nathan began by rolling for reinforcements but rolled a 1.
At this point seeing the devastation wrought upon his tanks on the right Nathan decided to move his weaker Cromwell into some cover to save it from the Panthers 75mm main cannon. Nathan then moved his command tanks into position behind some trees where my 2iC couldn't see them
He proceeded again to try and kill a panther with his firefly, once again he hit but I saved them from the big gun. He then turned his attention to my command panther with his command Cromwell. He opened fire scoring a direct hit on side armour cocking my command team
For my movement I moved my 2iC panther up to engage the hiding Cromwell in case my panther platoon failed to kill the firefly. I opened up on the firefly hiding behind a hedge with full rof and scored successful hits and getting the kill Nathan was forced at this point to take a motivational check and being 7th armoured he failed forcing his remaining Cromwell to flee the battlefield. I then turned my 2iCs gun towards Nathans three Cromwell's across the board. He opened fire and scored the two successful hit he needed on side armour going straight to firepower checked and destroying the two desired targets. This forced Nathan to take a motivational test on the lone Cromwell which also fled field. I decided at this point the field was more open to storm trooper my forces forward. The panther platoon on the right passed the test and began to move toward to buildings, my 2iC however failed to pass the test and my HQ Panther passed and moved forward.
Turn 4
Nathan rolled two dice for reinforcements and managed to get one. He then rolled to see where they would come in and rolled a 5 placing them right in front of my panthers (oh how I cried at this point). Nathan moved these newly arrived tanks towards my panthers. He also moved his command Cromwell's out into the open to deal with my 2iC.
This is where it all started going south for me as Nathan opened up from shot range on my panthers. He hit with his Cromwell's and firefly however I managed to save my armour checks thankfully.
I rolled my dice for reinforcements and got one platoons. I had a tough choice to make (not really since I had two platoons left) I choose to bring on my Panzer IVs and rolled to see where they came on. I rolled a 3 and deployed them slap bang in the middle of the board. I moved this platoon forward slightly to help reinforce the panthers on the right flank.
I decided my panthers to not move to maintain full rof on these new tanks. With only one Panther able to see them and being point blank I knew I had a chance to score at least one kill. However the dice gods decided better to mock me as I rolled two's. I then turned my Panzer IVs focus on the Cromwell command teams out in the open and took my shots. Only one hit but it was enough to light up the Cromwell. My 2iC eyed up the other command tank and fired at full rof into it once again I hit it and it went up in smoke At this point I decided the best bet would to to high tail it back to the other Panthers so there was more guns on target. I rolled for Storm Trooper on my panthers and began to push them back and passed so moved the panther back behind the hedge for extra protection with my guns on target. Once again my 2iC refused to storm trooper as did the Panzer IVs.
Turn 5
Nathan began his turn by rolling three dice this time for his remaining two platoons which he got. He choose to bring his Stuarts on first and rolled for scattered reserved and got five putting them on a direct line with my Panzer Grenadiers, he then rolled for his remaining tank platoon and got a four putting them smack in the middle of the board facing my 2iC and Panzer IVs.
He moved his newly arrived tank up onto a hill to provided semi indirect fire onto my Panzer IVs and his Firefly into a position to light up my 2iC. He then moved the tanks on the right flank to surround my retreating panthers and sent the Stuarts screaming down the left flank towards my Panzer Grenadiers.
He opened fire with his Cromwell's from the hill onto my Panzer IVs and scored direct hit killing one tank, his tanks which surrounded my panther opened fire hitting two but only managed to kill one of them. His firefly then decided to shoot my Panther hiding behind a hedge and scored a direct hit killing it out right forcing me to take a motivation check which I passed thankfully.
On my turn I rolled my three dice and got my last reinforcements. On the scatter roll I hit a 2 and my Wespes came in exactly where I didn't want them. Right in front of the Stuarts........
I decided at this point moving would be a moot point as it would lower my rof and I had a few more tanks to deal with. I rotated my panthers turret to face the Cromwell's who just took point blank shots at them. I rolled my two dice and scored one hit against them but I only managed to bail the one. I fired my remaining Panzer IVs against the Cromwell's surrounding my Panther. Scoring once again only one hit but it managed to cook off the Cromwell.
At this point I decided to storm trooper my remaining panther back towards to objective in an attempt to hold it. I rolled for my panther and managed to start pulling him back. However like always bother my 2iC and PzIVs decided against it as I failed my rolls.
Turn 6
Nathan began this turn by pushing everything he had forward. His Tyne Tees infantry who had sat behind a hill holding his objective now marched towards my 2iC. He then moved his Cromwell and firefly on the right flank after my lone panther desperate to end it. Next he pushed his Cromwell's from the hill top towards my panzer grenadiers.
The Cromwell and firefly on the right flank opened up on my panther again but luckily it survived to fight another day. However my panzer IVs were not so lucky has the Cromwell's fresh from thier hill climb bombarded them into oblivion. One was bailed and the other killed. His firefly focused its gun on my 2iC and fired. Once again it seemed the dice gods favoured Nathan today as my 2iC when up in a pillar of smoke and fire. Next on Nathan' agenda was these wespes which turned up at the wrong place at the wrong time. His Stuarts aimed thier guns and fired scoring one kill and bailing one. They then focused thier MGs on the panzer grenadiers and opened up killing three stands.
With the start of my turn I knew it was a lost cause but I wanted to take as much as I could with me. I moved my panther back onto the objective in the vain attempt to hold back the coming tide. Although in hind sight this proved fruitless but it was fun regardless. I attempted to range my one gun wespe team in on the Stuarts in front for a bombardment which I did on the second attempt meaning I needed fives to hit but would need to re roll successful hit. Didn't matter as I failed my rolls to hit anyway lol. My panther then turned its MGs on the approaching Tyne Tees rifles wanting to at least kill them but missed with all four shots.
I decided against storm trooper moving anything.
Turn 7
The last turn for both myself and Nathan. With most of my forces as burning wrecks he pushed his tanks closer on my objectives. His Cromwell and firefly on the right flank pushed up on the lone panther for a side armour shot and his three Cromwell's in the centre moved up to hose my panzer grenadiers with MGs.
As with before his Cromwell and firefly fired on the panther this time scoring a direct hit I was unable to save so the last panther finally died. His centre Cromwell's fired on my grenadiers and hit five times pinning them but I was able to make 4 infantry saves. The wespes didn't far so well from the Stuarts. Loosing one more to the little bastards (I learned to hate Stuarts after this game) after which they fired on my panzer grenadiers scoring another stand killed.
At this point there wasn't much left for me to do but die a warriors death. I moved my panzer grenadiers into assault range of the Cromwell's with my panzerschreck teams to one side able to fire upon the tanks. They opened fire with two rockets of which one hit but only bailed the tank. My lone wespe tried to bombard the already ranged in Stuarts but once again failed to hit. So I began my assault on the tanks with my remaining Panzer grenadiers which died under a fail of defensive fire from the other tank. I lost pretty much all of them and this left me with only one wespe and the command team on the board. With no HQ I instantly failed the company moral check and lost the game.
Conclusions
While I had the smaller force on the board I feel I had the superior fire power and armour but when I started killing tanks I got to cocky and moved forward before I could see where and when Nathan' reinforcements were coming from. I feel that if I had decided to hang back a turn or two more my loses wouldn't have been as great as they were.

Its that time again for another battle report however this is going to be a quick fire one without many pictures.
Today myself and Nathan were invited to the Morpeth Gaming Club by Daniel, Nathans future brother in law.
The forces we choose for this game was Panzer Lehr Panzer Kompanie for myself and British 7th Armoured for Nathan
We began the setup of the board and rolled for the mission which was a straight up encounter nothing special. We then rolled for attacker/defender I lost like always and got stuck as defender.
We had to put at least half our platoons into reserves for the delayed reserve rule and scattered reserves which left me feeling quite naked with only four platoons in my force but none the less I put in what I considered the best units for holding down the coming tide.

Key:
Allies (Green)
1: Stuarts came on as reserves
2: Armoured Platoon 1, started on the table
3: TT Rifle platoon, started on the table
4: Armoured Platoon 3, reserves
5: Armoured platoon 2, started on table
6: Armoured Platoon 4, reserves
Axis (red)
1: Panthers, started on the board
2: Panzer IVs, reserves
3: Armoured Panzergrenadier Lehr Platoon, starting platoon
4: Armoured Artillery Battery, reserves
Turn 1
As Nathan was the attack he had the first turn to which he quickly moved his platoons up to engage my panthers. His platoon on the right flank positioned itself behind a hedgerow to provide itself cover and the platoon on the right moved down my left flank towards my panzer grenadiers. When the shooting started Nathan' tanks on the right flank opened on up my panther platoon scoring successful hits which were however saved by myself. His tank platoon on my left flank however weren't so unlucky. His Firefly fired on my command HQ panther scoring a successful hit but only managed to bail him.
On my turn I made a school boy error and forgot two things. To roll for my bailed out tank and to roll to dig in my grenadiers. However on this minor note I forwent my movement and headed straight into shooting. I fired my panther platoon on the right flank into Nathan' armour requiring fives to hit and scored a successful hit. Nathan failed his armour check and I passed my firepower check resulting in one of his Cromwell's being engulfed in flames. I decided against doing s storm trooper move at this time as I felt unsure with the current forces on the board for myself.
Turn 2
Seeing the command HQ panther bailed still Nathan pushed his left platoon of Cromwell's up on my panzer grenadiers. He then dug his Tyne Tees rifle platoon in on his objective.
Onto the shooting, Nathan tried again to deal with the Panthers using his Firefly which hit again but only managed to bail the Panther it targeted. His Cromwell's now in MG range of my panzer grenadiers opened up in a hail of lead. They managed five hits however I made four infantry saves but the team was pinned at this point. Nathan then ended his turn.
At the start of my turn I rolled for my bailed out command panther and successfully got him back in his tank, I then rolled for my second panther and also got him back in. I left my command panther alone to take advantage of full RoF onto Nathan' exposed Cromwell's on the left flank.
I began the shooting with the with my panther platoon firing on the right flank scoring a successful hit and kill against Nathan' forces. My command panther and 2iC now shifted thier focus across to the other side of the field. The 2iC took a shot at the Firefly hiding behind the trees which my command HQ couldn't see. He successfully hit and took out this tank leaving only three Cromwell's on the left flank with a full RoF from the Command panther on the remaining Cromwell's.
Turn 3
At the start of turn three Nathan began by rolling for reinforcements but rolled a 1.
At this point seeing the devastation wrought upon his tanks on the right Nathan decided to move his weaker Cromwell into some cover to save it from the Panthers 75mm main cannon. Nathan then moved his command tanks into position behind some trees where my 2iC couldn't see them
He proceeded again to try and kill a panther with his firefly, once again he hit but I saved them from the big gun. He then turned his attention to my command panther with his command Cromwell. He opened fire scoring a direct hit on side armour cocking my command team
For my movement I moved my 2iC panther up to engage the hiding Cromwell in case my panther platoon failed to kill the firefly. I opened up on the firefly hiding behind a hedge with full rof and scored successful hits and getting the kill Nathan was forced at this point to take a motivational check and being 7th armoured he failed forcing his remaining Cromwell to flee the battlefield. I then turned my 2iCs gun towards Nathans three Cromwell's across the board. He opened fire and scored the two successful hit he needed on side armour going straight to firepower checked and destroying the two desired targets. This forced Nathan to take a motivational test on the lone Cromwell which also fled field. I decided at this point the field was more open to storm trooper my forces forward. The panther platoon on the right passed the test and began to move toward to buildings, my 2iC however failed to pass the test and my HQ Panther passed and moved forward.
Turn 4
Nathan rolled two dice for reinforcements and managed to get one. He then rolled to see where they would come in and rolled a 5 placing them right in front of my panthers (oh how I cried at this point). Nathan moved these newly arrived tanks towards my panthers. He also moved his command Cromwell's out into the open to deal with my 2iC.
This is where it all started going south for me as Nathan opened up from shot range on my panthers. He hit with his Cromwell's and firefly however I managed to save my armour checks thankfully.
I rolled my dice for reinforcements and got one platoons. I had a tough choice to make (not really since I had two platoons left) I choose to bring on my Panzer IVs and rolled to see where they came on. I rolled a 3 and deployed them slap bang in the middle of the board. I moved this platoon forward slightly to help reinforce the panthers on the right flank.
I decided my panthers to not move to maintain full rof on these new tanks. With only one Panther able to see them and being point blank I knew I had a chance to score at least one kill. However the dice gods decided better to mock me as I rolled two's. I then turned my Panzer IVs focus on the Cromwell command teams out in the open and took my shots. Only one hit but it was enough to light up the Cromwell. My 2iC eyed up the other command tank and fired at full rof into it once again I hit it and it went up in smoke At this point I decided the best bet would to to high tail it back to the other Panthers so there was more guns on target. I rolled for Storm Trooper on my panthers and began to push them back and passed so moved the panther back behind the hedge for extra protection with my guns on target. Once again my 2iC refused to storm trooper as did the Panzer IVs.
Turn 5
Nathan began his turn by rolling three dice this time for his remaining two platoons which he got. He choose to bring his Stuarts on first and rolled for scattered reserved and got five putting them on a direct line with my Panzer Grenadiers, he then rolled for his remaining tank platoon and got a four putting them smack in the middle of the board facing my 2iC and Panzer IVs.
He moved his newly arrived tank up onto a hill to provided semi indirect fire onto my Panzer IVs and his Firefly into a position to light up my 2iC. He then moved the tanks on the right flank to surround my retreating panthers and sent the Stuarts screaming down the left flank towards my Panzer Grenadiers.
He opened fire with his Cromwell's from the hill onto my Panzer IVs and scored direct hit killing one tank, his tanks which surrounded my panther opened fire hitting two but only managed to kill one of them. His firefly then decided to shoot my Panther hiding behind a hedge and scored a direct hit killing it out right forcing me to take a motivation check which I passed thankfully.
On my turn I rolled my three dice and got my last reinforcements. On the scatter roll I hit a 2 and my Wespes came in exactly where I didn't want them. Right in front of the Stuarts........
I decided at this point moving would be a moot point as it would lower my rof and I had a few more tanks to deal with. I rotated my panthers turret to face the Cromwell's who just took point blank shots at them. I rolled my two dice and scored one hit against them but I only managed to bail the one. I fired my remaining Panzer IVs against the Cromwell's surrounding my Panther. Scoring once again only one hit but it managed to cook off the Cromwell.
At this point I decided to storm trooper my remaining panther back towards to objective in an attempt to hold it. I rolled for my panther and managed to start pulling him back. However like always bother my 2iC and PzIVs decided against it as I failed my rolls.
Turn 6
Nathan began this turn by pushing everything he had forward. His Tyne Tees infantry who had sat behind a hill holding his objective now marched towards my 2iC. He then moved his Cromwell and firefly on the right flank after my lone panther desperate to end it. Next he pushed his Cromwell's from the hill top towards my panzer grenadiers.
The Cromwell and firefly on the right flank opened up on my panther again but luckily it survived to fight another day. However my panzer IVs were not so lucky has the Cromwell's fresh from thier hill climb bombarded them into oblivion. One was bailed and the other killed. His firefly focused its gun on my 2iC and fired. Once again it seemed the dice gods favoured Nathan today as my 2iC when up in a pillar of smoke and fire. Next on Nathan' agenda was these wespes which turned up at the wrong place at the wrong time. His Stuarts aimed thier guns and fired scoring one kill and bailing one. They then focused thier MGs on the panzer grenadiers and opened up killing three stands.
With the start of my turn I knew it was a lost cause but I wanted to take as much as I could with me. I moved my panther back onto the objective in the vain attempt to hold back the coming tide. Although in hind sight this proved fruitless but it was fun regardless. I attempted to range my one gun wespe team in on the Stuarts in front for a bombardment which I did on the second attempt meaning I needed fives to hit but would need to re roll successful hit. Didn't matter as I failed my rolls to hit anyway lol. My panther then turned its MGs on the approaching Tyne Tees rifles wanting to at least kill them but missed with all four shots.
I decided against storm trooper moving anything.
Turn 7
The last turn for both myself and Nathan. With most of my forces as burning wrecks he pushed his tanks closer on my objectives. His Cromwell and firefly on the right flank pushed up on the lone panther for a side armour shot and his three Cromwell's in the centre moved up to hose my panzer grenadiers with MGs.
As with before his Cromwell and firefly fired on the panther this time scoring a direct hit I was unable to save so the last panther finally died. His centre Cromwell's fired on my grenadiers and hit five times pinning them but I was able to make 4 infantry saves. The wespes didn't far so well from the Stuarts. Loosing one more to the little bastards (I learned to hate Stuarts after this game) after which they fired on my panzer grenadiers scoring another stand killed.
At this point there wasn't much left for me to do but die a warriors death. I moved my panzer grenadiers into assault range of the Cromwell's with my panzerschreck teams to one side able to fire upon the tanks. They opened fire with two rockets of which one hit but only bailed the tank. My lone wespe tried to bombard the already ranged in Stuarts but once again failed to hit. So I began my assault on the tanks with my remaining Panzer grenadiers which died under a fail of defensive fire from the other tank. I lost pretty much all of them and this left me with only one wespe and the command team on the board. With no HQ I instantly failed the company moral check and lost the game.
Conclusions
While I had the smaller force on the board I feel I had the superior fire power and armour but when I started killing tanks I got to cocky and moved forward before I could see where and when Nathan' reinforcements were coming from. I feel that if I had decided to hang back a turn or two more my loses wouldn't have been as great as they were.
Monday 8 August 2011

Sunday 7 August 2011
Battle Report Saturday 06/08/2011
Hi guys,
Time for a battle report from the game myself and Nathan played last night. The forces we choose were SS Panzer Kompanie for myself from Earth & Steel and Nathan took a Finnish StuG Kompanie from a PDF hosted on Battlefront.
We rolled for scenario from Das Book and got Break Out. For this game the winner was decided by whoever was holding an objective at the start of thier turn. We rolled for attacker and defender. I lost the roll so I had to be the attacker while Nathan went defense. Once the terrain was setup three objectives were placed 8" apart from each other around the table centre.
Nathan had the choice to hold some of his forces off as reinforcements, I on the other hand had to take at least half mine off as reinforcements and being I only have five platoons I felt at a slight disadvantage.
Once this was done as the attacker I was able to remove one objective. I removed the closest one to Nathan and we began our deployment

Turn 1
Once we had deployed the attacker got the first turn. I rolled to see if I got any reinforcements and the dice gods were against me this time. I dismounted my Panzer Grenadiers and moved them towards the closest objective and house to provide some cover. I moved the half tracks up to the woods so to position them where they could open fire in defensive fire or offensive if need be. I then choose to move my panthers up towards Nathans line hopefully trying to kill some stuff. However when it came to shooting I fired my command Panther at Nathans PaK 40s and rolled a six which hit however he managed to get his save. My next shooting from the other panthers fired upon Nathans cheeky artillery observer which once again I managed to roll a six to hit the little bugger however Nathan must have prayed to the dice gods and managed to make another infantry save.

Now it was Nathan' turn and it seemed the dice god had left him as he failed his reinforcement roll. So he moved on to movement and began to push his infantry towards the second closest objective to him. He then positioned his StuGs in a pretty formation for the upcoming Panther push. So ended his movement phase and began his shooting. The first thing he did was rotate a PaK 40 to face my command Panther. He rolled and scored a successful hit however I rolled and beat his score and the shell merely bounced off and mildly annoyed the Panther crew. His next step was to use the observer who survived a 75mm shell bouncing off his head and zero in his artillery on my poor Panther platoon. He managed this on his first go and two of my Panthers were about to feel some pain. His rolls to hit seem to please the dice gods as both Panthers got hit however my rolls to save weren't so good. One Panther went pop and poor Barkman was shaken but saved. So ended the end of Nathan' shooting step.
 Turn 2
At this point I rolled two dice for my reinforcements and the dice gods smiled upon me. I got two lots of reinforcements and decided to bring on my 88 and Panzer Pioneers. I put my 88 in the opposite corner to where my main force was and brought the Pioneers in with my main force. Now onto my movement step I moved two stands and the command team of my panzer grenadiers into the building next to the objective and dug the rest of the team in next to the objective. I then began to attempt and move my half tracks into the woods next to the objective. Two passed thier bogging checks and two failed. I then moved the Panthers closer to Nathan' lines to try and do some damage however they failed miserably and did nothing but annoy the Finnish forces. So concluded my attempt.
On Nathan' turn he rolled his dice and successfully managed to get one of his platoons from his reinforcements. He brought his third StuG team on his reinforcement zone and moved them straight towards my newly brought in Pioneers. He proceeded then to move his infantry into range to contest the second objective and move his StuGs across the hedge row straight towards my command Panther (all of which passed thier bogging down checks) he positioned these StuGs in a formation I can only refer to as "rape" and so began the shooting. The StuGs which had surrounded my Panther commander had left a gap to allow the PaK 40 to once again fire on my Panther. Once again he hit and I saved, however here is where the pain began. His three StuGs in front of my Panther fired, hit and got saved. However his sneaky StuG which managed to get to my side armour fire, hit and blew my command Panther to kingdom come. From this point is kind of went downhill. His new StuG platoon he just brought on fired upon my Pioneers and hit and killed two trucks both of which I failed to save the stands inside them. Nathan then choose to attempt to range in on my Panther's coming up on his left flank. Once again he managed to range in first time. He fired on my Panther's this time only managing to bail one of them.


Turn 3
At the start of turn 3 I had my panzer grenadiers within 4" of my objective and won the game.
End of game report
Once this game was over myself, Nathan and Stuart had a discussion on how this game type was slightly flawed as despite how much stuff I had actually have lost Nathan pointed out I could have won by turn 2. It was a brutal fight and I agree I might now have played the force how it was meant to be played. The terrain layout was against Nathan as he had no way of getting any of his forces into position to contest my closest objective which I could reach at the start of the game
Time for a battle report from the game myself and Nathan played last night. The forces we choose were SS Panzer Kompanie for myself from Earth & Steel and Nathan took a Finnish StuG Kompanie from a PDF hosted on Battlefront.
We rolled for scenario from Das Book and got Break Out. For this game the winner was decided by whoever was holding an objective at the start of thier turn. We rolled for attacker and defender. I lost the roll so I had to be the attacker while Nathan went defense. Once the terrain was setup three objectives were placed 8" apart from each other around the table centre.
Nathan had the choice to hold some of his forces off as reinforcements, I on the other hand had to take at least half mine off as reinforcements and being I only have five platoons I felt at a slight disadvantage.
Once this was done as the attacker I was able to remove one objective. I removed the closest one to Nathan and we began our deployment
Turn 1
Once we had deployed the attacker got the first turn. I rolled to see if I got any reinforcements and the dice gods were against me this time. I dismounted my Panzer Grenadiers and moved them towards the closest objective and house to provide some cover. I moved the half tracks up to the woods so to position them where they could open fire in defensive fire or offensive if need be. I then choose to move my panthers up towards Nathans line hopefully trying to kill some stuff. However when it came to shooting I fired my command Panther at Nathans PaK 40s and rolled a six which hit however he managed to get his save. My next shooting from the other panthers fired upon Nathans cheeky artillery observer which once again I managed to roll a six to hit the little bugger however Nathan must have prayed to the dice gods and managed to make another infantry save.
Now it was Nathan' turn and it seemed the dice god had left him as he failed his reinforcement roll. So he moved on to movement and began to push his infantry towards the second closest objective to him. He then positioned his StuGs in a pretty formation for the upcoming Panther push. So ended his movement phase and began his shooting. The first thing he did was rotate a PaK 40 to face my command Panther. He rolled and scored a successful hit however I rolled and beat his score and the shell merely bounced off and mildly annoyed the Panther crew. His next step was to use the observer who survived a 75mm shell bouncing off his head and zero in his artillery on my poor Panther platoon. He managed this on his first go and two of my Panthers were about to feel some pain. His rolls to hit seem to please the dice gods as both Panthers got hit however my rolls to save weren't so good. One Panther went pop and poor Barkman was shaken but saved. So ended the end of Nathan' shooting step.
Turn 2At this point I rolled two dice for my reinforcements and the dice gods smiled upon me. I got two lots of reinforcements and decided to bring on my 88 and Panzer Pioneers. I put my 88 in the opposite corner to where my main force was and brought the Pioneers in with my main force. Now onto my movement step I moved two stands and the command team of my panzer grenadiers into the building next to the objective and dug the rest of the team in next to the objective. I then began to attempt and move my half tracks into the woods next to the objective. Two passed thier bogging checks and two failed. I then moved the Panthers closer to Nathan' lines to try and do some damage however they failed miserably and did nothing but annoy the Finnish forces. So concluded my attempt.
On Nathan' turn he rolled his dice and successfully managed to get one of his platoons from his reinforcements. He brought his third StuG team on his reinforcement zone and moved them straight towards my newly brought in Pioneers. He proceeded then to move his infantry into range to contest the second objective and move his StuGs across the hedge row straight towards my command Panther (all of which passed thier bogging down checks) he positioned these StuGs in a formation I can only refer to as "rape" and so began the shooting. The StuGs which had surrounded my Panther commander had left a gap to allow the PaK 40 to once again fire on my Panther. Once again he hit and I saved, however here is where the pain began. His three StuGs in front of my Panther fired, hit and got saved. However his sneaky StuG which managed to get to my side armour fire, hit and blew my command Panther to kingdom come. From this point is kind of went downhill. His new StuG platoon he just brought on fired upon my Pioneers and hit and killed two trucks both of which I failed to save the stands inside them. Nathan then choose to attempt to range in on my Panther's coming up on his left flank. Once again he managed to range in first time. He fired on my Panther's this time only managing to bail one of them.
Turn 3
At the start of turn 3 I had my panzer grenadiers within 4" of my objective and won the game.
End of game report
Once this game was over myself, Nathan and Stuart had a discussion on how this game type was slightly flawed as despite how much stuff I had actually have lost Nathan pointed out I could have won by turn 2. It was a brutal fight and I agree I might now have played the force how it was meant to be played. The terrain layout was against Nathan as he had no way of getting any of his forces into position to contest my closest objective which I could reach at the start of the game
Thursday 4 August 2011
Random old pics.
So I installed Picasa on my PC to help with this new "blogging" lark and it dragged up loads of old pics from my other hard drive I didn't know I still had of some bits and bobs and WIPs from the last 4-5 years or so. Some are absolute crap, some are ok but I'd like to think I've improved a bit since then, judge for yourself:


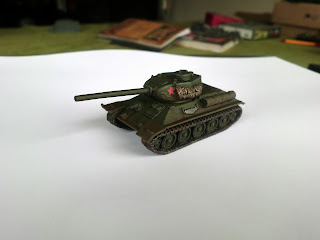
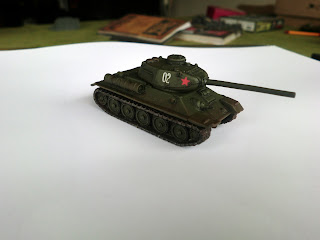
T-34/85 update.
As title suggests a few pics of my first completed T-34/85. I wanted to get these done with a reasonable speed but to a good tabletop standard and done en masse.
Firstly Base coat of GW Chaos Black, airbrushed with a base of Russian Green then a dusting of 50/50 Reflective Green and German Camo Bright Green which I then brush highlighted this with a mix of Russian Green and Buff.
After this I glossed the whole tank and gave it a pin wash using thinned Mig Abteilung Oil Black, I sealed this again with another gloss then added decals, thin gloss again then added weathering like streaks down the sides of the armour for this I used Mig Abt Oil again but this time Shadow Brown and sealed again with a light gloss.
Finally I applied MIG weathering powders I used Old Rust on the tracks and a 50/50 mix of Old Rust and Dry Mud on the lower sections of the hull and turret. Finally Testors Dullcote, I don't normally use this as I've had issues with it in the past but wanted to give another try and it's worked to a reasonable degree. Not as matte as the Army Painter but that keeps leaving small white flecks on my models which you have to scrape off with scalpel when hard (not ideal I think you'll agree).
Still a few tiny details to pick out like the bocket on the engine deck and the exhausts but it's pretty much there and regardless of all the spiel above this it was VERY quick to do compared to my German work.


Subscribe to:
Posts (Atom)